Hearty Italian meals have always been some of my favorites to both make at home and order out. I can eat pasta day and night for weeks without getting tired of it. And sometimes I do. But it’s rare that I serve or indulge in the wonderful Italian breads that so often accompany those meals. After all, a girl has to watch her figure with all of those carbs, right? 😉
But in all seriousness, I do enjoy a good Italian bread, slathered in sweet butter, dunked in herb-infused olive oil, or well toasted with a hefty dose of garlic. All of that goodness comes out when I entertain. This garlic ciabatta bread is one of my favorites to prepare, as it’s got enormous flavor and is easy to prepare. When entertaining, I make the garlic-olive oil mixture in advance, so that it only takes a minute to put together and move to the oven for a quick bake while I spend time with friends. Enjoy!
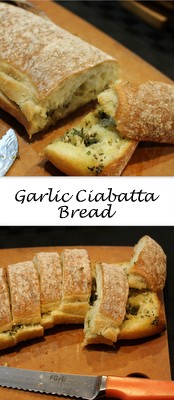
Garlic Ciabatta Bread
Adapted from Ina Garten’s Barefoot Contessa Back to Basics (p. 184)
Ingredients:
1/2 c. extra virgin olive oil
1/4 c. fresh parsley, finely chopped
6 large cloves of garlic, crushed or finely minced
1 tsp. kosher salt
1/2 tsp. black pepper
2 Tbs. unsalted butter, at room temperature
1 loaf ciabatta bread
Preheat oven to 350F.
In a small saucepan over medium-low heat, heat olive oil, parsley, garlic, salt, and pepper until garlic is translucent and has infused the olive oil, about 5 minutes. Remove from heat.
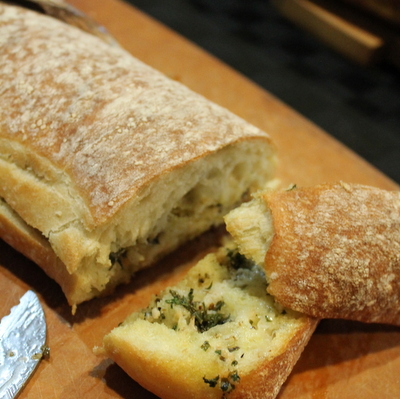
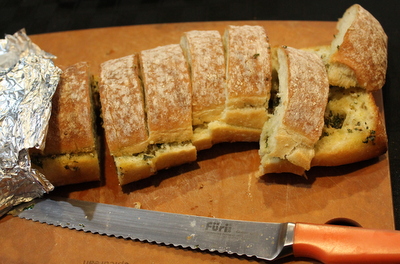
Slice a loaf of ciabatta horizontally. On one half, spread butter. Spread the garlic-olive oil mixture on the other half. Put back together and wrap in aluminum foil.
Place on a baking sheet and bake for 10 minutes, until bread is heated throughout. Remove from oven and slice.
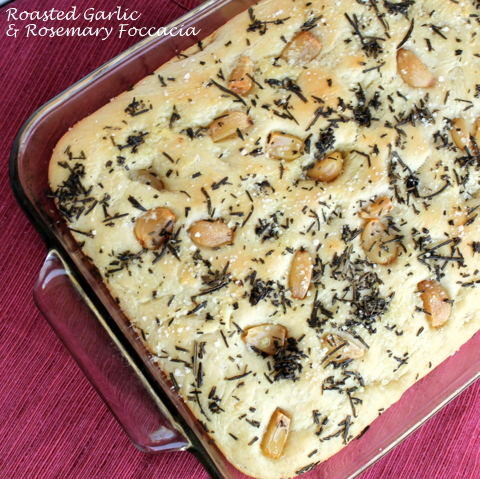
This month’s What’s Baking? theme was chosen by Nicole from Seven Ate Nine – Bake With Garlic. At first I was excited by the theme, the chance to do something a little more savory. But then I started worrying about what to make. With Easter entertaining on the agenda, I decided to accompany my usual Beef Wellington with fresh bread, inspired by this month’s theme. The “baking” was twofold – first roasting the garlic until soft and sweet, flavoring good olive oil, and then using the two components to bake into bread.
I’ve made fresh focaccia bread once before and was impressed with both the ease and the wonderful flavor. This recipe produced the same results. Like most fresh breads, it’s takes a little while to make, due to the rising time, but the result is worth the effort. (For your convenience, I added the time required for each step in bold, at the step, in case you need to break up the steps or plan your day around them.)
Roast the Garlic and Flavor the Olive Oil: Preheat oven to 300°F.
Place olive oil in a small oven-safe bowl. Add garlic, top-side down. Cover bowl with foil and cook until garlic is soft, 45-60 minutes.
Remove from oven and allow to cool before removing garlic from oil and removing garlic cloves from the skin, setting aside the cloves to use on the bread later. If needed, pour oil through a mesh strainer or cheesecloth to remove solids. Set aside.
Time: 1 hour
Make the Dough: In the bowl of a stand mixer, gently stir warm water and yeast with a wooden spoon or plastic spatula to dissolve yeast. Allow to sit until the mixture begins to foam, about 5 minutes.
Transfer bowl to the stand mixer and fit with the dough hook. Add flour, fine sea salt, and 2 Tbs. roasted garlic olive oil. Mix on low speed, stopping periodically to scrape dough off hook, until mixture is smooth and slightly sticky, 10-15 minutes.
In a clean bowl, place 1 Tbs. reserved olive oil. Add dough ball to bowl and turn to coat completely in oil. Cover with a clean kitchen towel and set in a warm place to rise. Dough should double in size, about 2 hours. (Note: In my house, I find that dough rises best when placed in the kitchen while I’m using the stove/oven or by my gas fireplace, left on. I apparently keep my house too cool for dough to rise easily without an additional heat source.)
Time: 2 to 2 1/2 hours
Rest: Place 1 Tbs. reserved olive oil in a 9×13 baking dish (I used a Pyrex dish). Spread, ensuring bottom and sides are coated.
Uncover and punch down dough. Transfer to prepared baking dish, stretching so that it covers the entire dish. Cover again with clean towel and allow to rest for 30 minutes.
Time: 45 minutes
Bake the Bread: When dough is resting, preheat the oven to 450°F.
After dough has finished resting, use clean fingers to a dimple dough (pressing slightly with fingertips, all over). Brush with remaining roasted garlic olive oil (you may have some leftover) and add reserved garlic cloves. Sprinkle with flakey sea salt and chopped rosemary.
Place in oven and immediately lower temperature to 375°F. Bake until golden brown, 20-30 minutes.
Allow to rest on a wire rack to cool slightly before serving.
Time: 30 minutes + time to cool slightly (additional 15ish minutes)
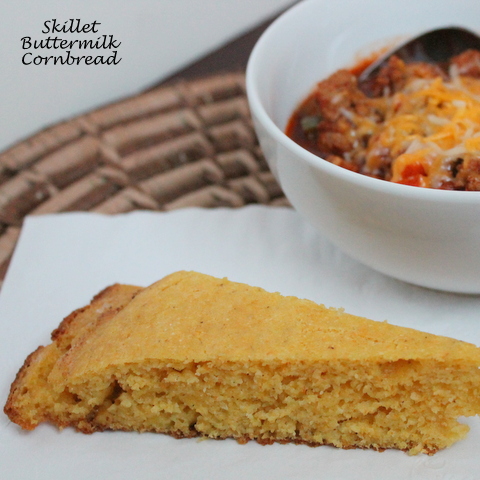
This month’s theme for What’s Baking? – baking bread – was chosen by Heather at Hezzi-D’s Books and Cooks. I definitely debated about whether to use this as an excuse to make a warm, crusty baguette. I contemplated a dinner of fresh bread and cheese, maybe a little fresh fruit and olives… but I bet my hubby would tell me that’s not an acceptable dinner. After all, he scoffed at a box of Girl Scout cookies for lunch. Apparently 6+ months pregnant isn’t an excuse to indulge. Anyway, in the end, I decided that with the cold weather we’ve been having, I’d make a hearty dinner of our favorite chili and made-from-scratch traditional cornbread.
This recipe is super easy – it took only a few minutes to put together and surprisingly little time to bake. My oven runs a tad hot, so I ended up with a slightly crispy edge that I couldn’t help but eat first. 🙂
3 Tbs. unsalted butter, cut into a couple of pieces
Ensure that a rack is placed in the center of the oven. Place a 9-10 inch cast-iron skillet in an oven and heat to 425°F. Allow skillet to sit in the oven until the oven is completely preheated, if not longer.
In a large bowl, whisk together remaining cornmeal, flour, sugar, baking powder, baking soda, and salt. Set aside.
In a small pot, bring 1/2 c. water to a boil. Whisk in 1/2 c. of the cornmeal until a thick mush has formed. Whisk in buttermilk, sour cream, and eggs until smooth.
When oven has been properly preheated, about 20 minutes, add the wet ingredients to the dry ingredients. Stir together with a wooden spoon until smooth and no clumps remain. Switch to a whisk if a few stubborn clumps remain.
Remove hot skillet from oven and add butter pieces, swirling pan to spread the butter and coat the bottom. Immediately pour cornmeal mixture into pan. Return to oven and bake for 18-20 minutes, until top is golden and bread begins to pull away from the sides.
Remove from oven and turn out onto a wire rack. Allow to cool for 5 minutes before serving.
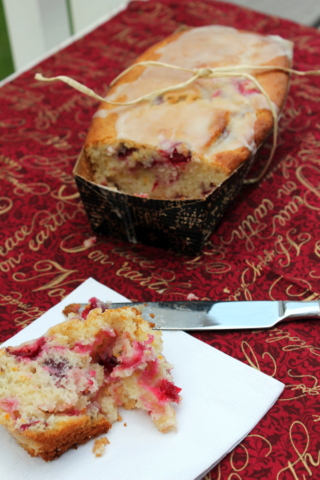
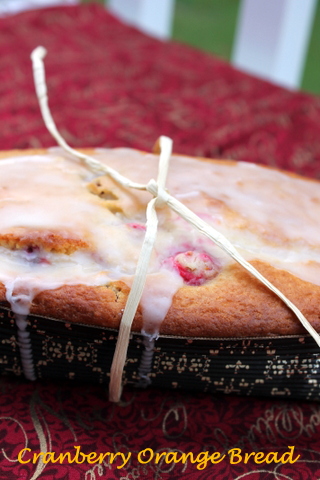
Welcome to the first in 12 weeks of Christmas treats, a weekly blog hop hosted by Meal Planning Magic. Now I know it’s early to be thinking about Christmas, but the holiday season is a particularly busy one for me and I like to get a jump start on those holiday care packages and the big holiday party that my hubby and I host each year. So I’m already making lists of goodies that I want to make, and trying to pencil in some time to get baking. This particular bread recipe freezes well without the glaze (and tastes great without it, if you prefer) and will definitely be making an appearance in some of my care packages this December.
Makes 1 standard loaf (or two smaller, half loaves)
Ingredients for the Bread:
1/2 c. unsalted butter, melted and cooled, plus more for pan
2 c. all-purpose flour, plus more for pan
3/4 c. granulated sugar
1 Tbs. baking powder
3/4 tsp. salt
1 1/4 c. cranberries, halved
1 c. buttermilk
2 large eggs, at room temperature
1 tsp. vanilla extract
1 1/2 Tbs. finely grated orange zest
Ingredients for the Glaze:
1 c. confectioners’ sugar, sifted
4 tsp. freshly squeezed orange juice
Preheat oven to 350F. If using a standard loaf pan, grease the pan with 1 Tbs. softened butter and lightly flour. Same thing for a disposable aluminum pan. (My pans, purchased from Michael’s craft stores, did not need to be greased, so I omitted this step.)
In a large bowl, whisk together flour, sugar, baking powder and salt. Stir in cranberries.
In a separate bowl, whisk together buttermilk, eggs, vanilla and orange zest. Pour mixture, as well as melted butter, over dry ingredients. Gently fold in until no dry ingredients remain.
Pour into prepared baking pan and bake until the top is golden and a toothpick inserted into the center comes out clean, 50-60 minutes for a standard loaf pan, and 35-45 minutes for a half-loaf.
Allow to cool in pan on a wire rack for 30 minutes. Invert bread onto a rack to cool completely before adding glaze.
If using disposable liners, cool completely. Wrap tightly in plastic wrap and freeze, without glaze.
Glaze Bread: Whisk together confectioners’ sugar and orange juice until smooth, adding extra orange juice by the teaspoon, if needed, to thin glaze. Drizzle over loaf. Store at room temperature, covered, for up to 2 days.
If glazing after freezing, allow bread to thaw completely before adding glaze.
This month is my first to participate in a blogging event called What’s Baking? Every month or two, a blogger will choose a theme, and the rest of us will bake something that fits in with the theme. It’s a great way to try out new recipes, sometimes out of your comfort zone.
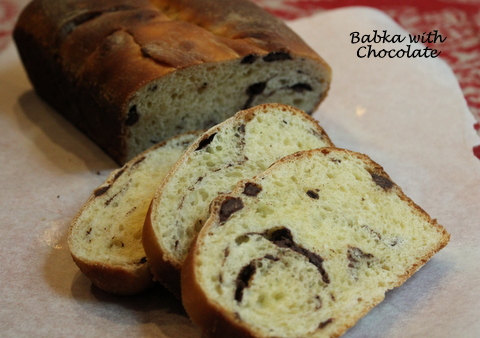
This month, the theme of “Heritage Dish” was chosen by Ali from Sparks from the Kitchen. This theme couldn’t have come at a better time, as I recently saw my Polish grandparents. What’s Baking? was the perfect excuse to make something that my grandpa always enjoyed – babka.
Babka is a sweet yeast bread or cake from Eastern Europe. Growing up, my family served the Jewish version, a bread (the cake version is associated with Christian Easter and other holidays). I don’t recall anyone ever making it but it was ordered from bakeries a time or two around both Easter and Christmas.
This version is streaked with semisweet chocolate. My coworkers polished off two loaves of this bread before noon one day. My grandfather, however, was not as impressed. He reminded me every time he had a slice, that I should have used raisins in it, and that it was a little heavy. But he ate two or three slices a day, so it couldn’t have been that bad. 🙂
Baking Note: The original recipe made 4 loaves of bread. I halved the recipe below, because even though it’s freezable, four loaves is quite a lot. If you choose to freeze the dough, it can be frozen for up to a month. Defrost in the fridge 24-hours before using. Then roll out the dough, allow it to rest and rise, and bake.
Chocolate-Flecked Babka
Adapted from Artisan Bread in Five Minutes a Day (by Jeff Hertzberg and Zoe Francois), p. 221
Makes 2 loaves
Ingredients:
1 1/2 c. lukewarm milk
8 egg yolks
3/4 Tbs. granulated yeast (1 packet)
1 tsp. kosher salt
6 Tbs. unsalted butter, melted, plus more for greasing the pan
3 3/4 c. all-purpose flour
1 c. finely chopped or shaved semisweet (or bittersweet) chocolate
1/8 c. rum, divided (for soaking the bread)
In the bowl of a stand mixer, stir together milk, yolks, salt, and butter with a wooden spoon until fairly well combined. Attach bowl to mixer and fit with dough hook. Add flour and stir on speed 2 (the highest speed my mixer could handle using the dough hook) until all of the flour has been incorporated. The mixture will be fairly loose.
Cover loosely with plastic wrap and allow to rest at room temperature until the dough rises and collapses (or flattens on top), about 2 hours. (I tend to place the bread near the oven/stove, when it’s turned on to help it along a little).
When the dough has risen, brush with half of the rum and refrigerate (still covered loosely with plastic wrap) until chilled.
Here, the dough can be refrigerated for up to 5 days, or frozen for up to a month. If using dough from the freezer, allow to defrost in the fridge for 24 hours before resuming recipe below.
On baking day, grease a standard loaf pan and set aside. .
Lightly flour a work surface with flour. Remove dough from fridge and cut dough in half. Dust with flour and shape into a ball by stretching the surface of the below around to the bottom. Roll out into a rectangle, approximately 1/4-inch thick. Sprinkle the entire piece of the dough (including edges) with half of the shaved chocolate (1/2 c.). Roll into a log, starting at the short end. Fold the ends of the log into the middle, so that the ends meet. Place in prepared loaf pan and allow to rise and rest, about 2 hours.
Repeat with the second portion of dough, if you’re baking both at once.
Shortly before before baking, ensure that a rack is in the center of the oven and preheat oven to 350F. Bake for 30-35 minutes, until golden brown and firm.
Remove from the oven and brush with rum. Allow to rest for a few minutes before moving to a wire rack to cool completely.