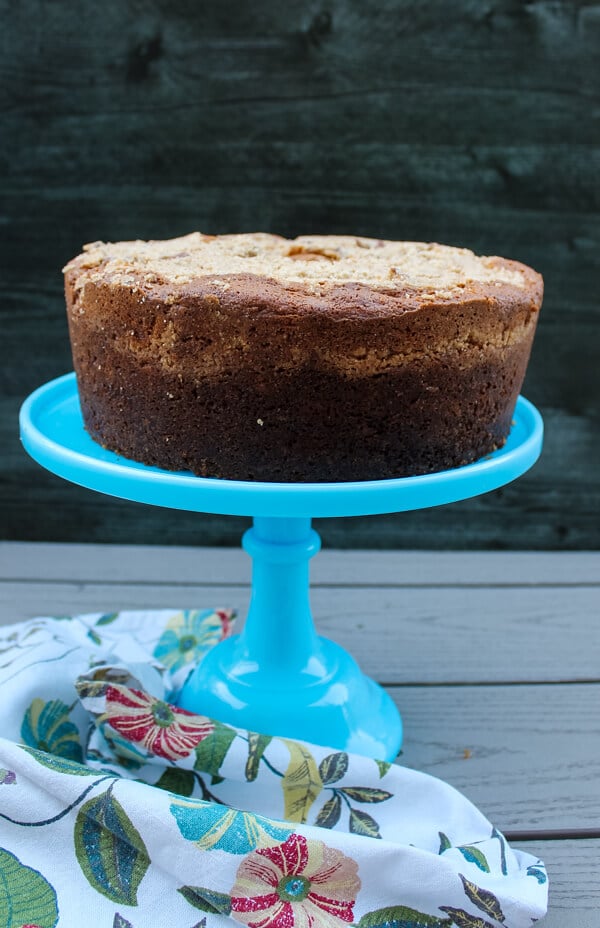
Rich, buttery vanilla cake with ribbons of brown sugar and toasted pecans, this Sour Cream Coffee Cake with Toasted Pecan Filling is a deliciously sweet treat to serve up this fall for brunch, snack or dessert.
Disclaimer: This post is sponsored in conjunction with #FallFlavors week. I received product samples from sponsor companies to help in the creation of the #FallFlavors recipes. All opinions are mine alone.
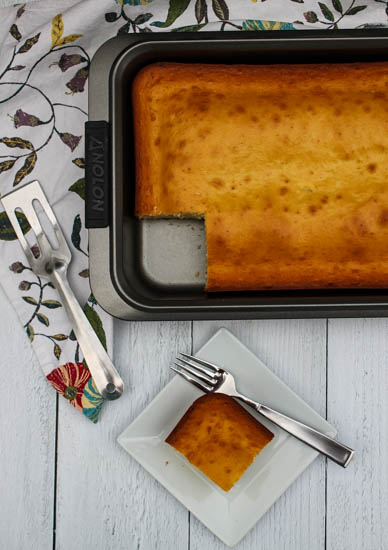
My family’s Sponge Cake is just barely sweet, light with little pockets of air throughout. Enjoy it on it’s own for snack, afternoon tea, or dessert, or sweeten it with fresh fruit and whipped cream.
Disclaimer: This post is sponsored in conjunction with #SpringSweetsWeek. I received product samples from sponsor companies to help in the creation of the #SpringSweetsWeek recipes. All opinions are mine alone.
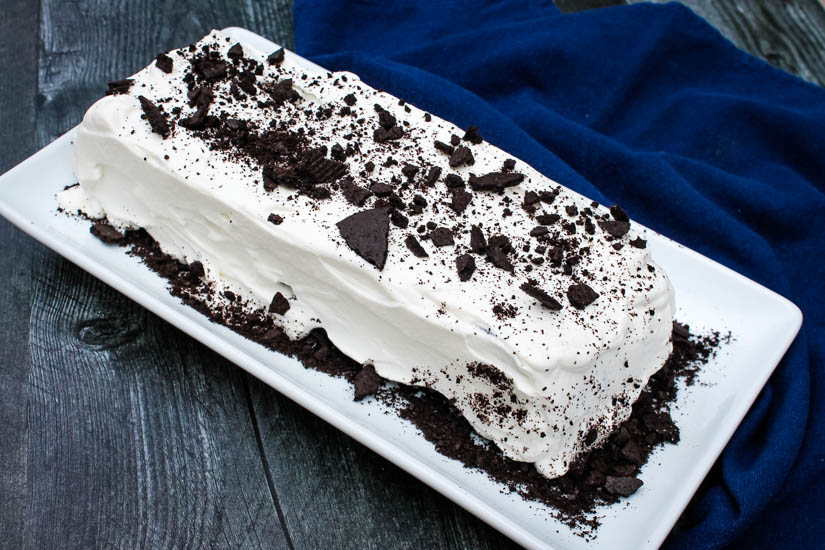
What better way to enjoy summer than with a 4-ingredient, no-bake sweet treat? This Vanilla Icebox Cake is rich in vanilla flavor, easy to prepare, and is best made ahead – making for great summer entertaining!
Disclaimer: This post and recipe was created for #SummerDessertWeek! I was sent samples by some of the sponsor companies but as always opinions are 100% mine.
Can you guys tell that I’m all about the old-school family recipes lately? First it was my mom’s Macaroni Salad, and then my go-to cocktail, a Classic Cosmo. And today? To celebrate the first day of #SummerDessertWeek, I’m bringing you a Vanilla Icebox Cake.
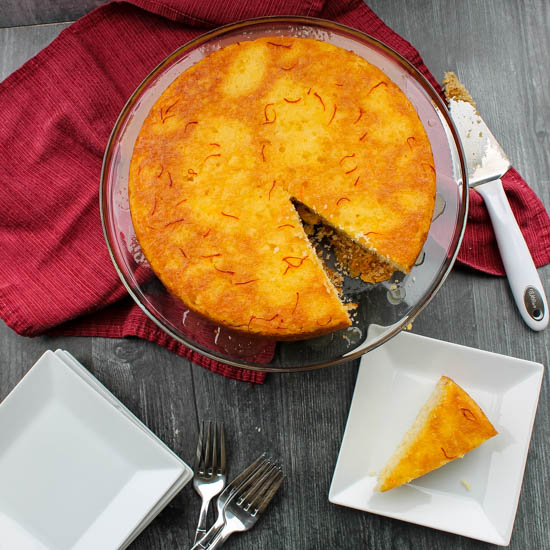
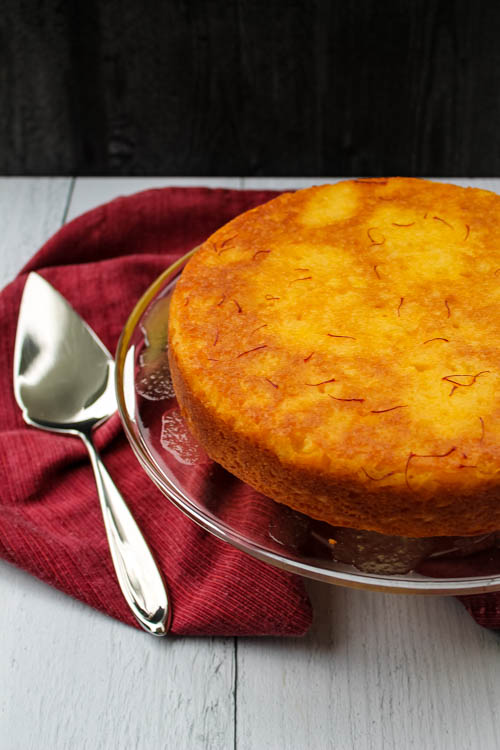
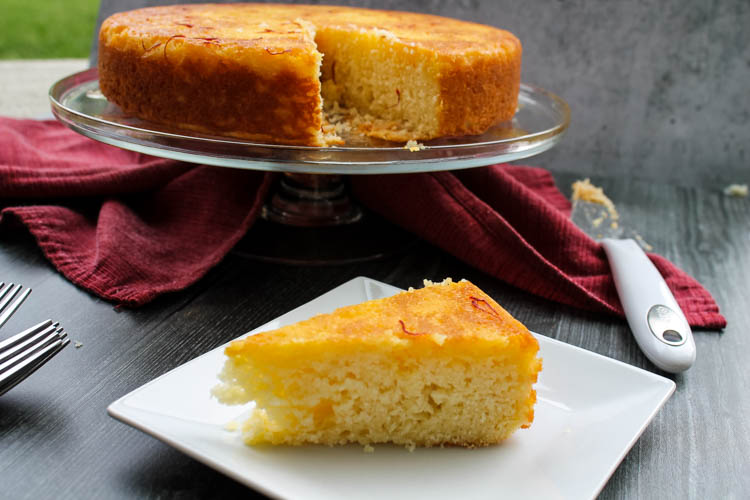
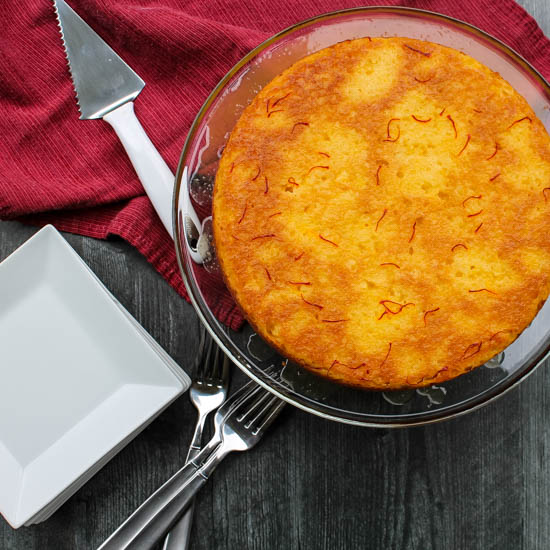
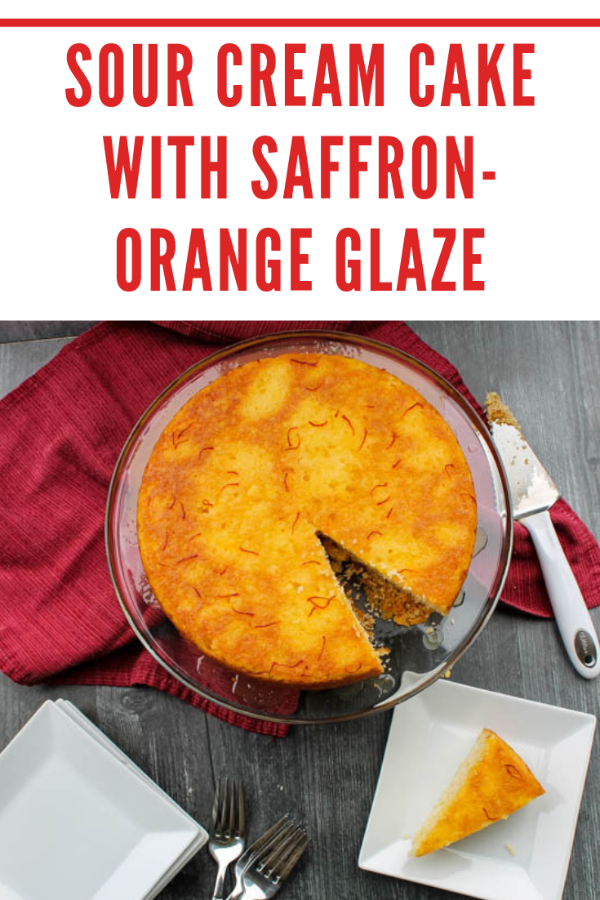
Put a sweet twist on that jar of saffron at the back of your spice cabinet! This light sour cream cake gets a sweet saffron-orange glaze that is beautiful and surprising.
A while back, my parents went to Europe and brought me back a tiny little jar of saffron as a souvenir. I’m not going to lie, apart from paella, I had no idea what to do with it. But my mom told me that she had this amazing saffron cake, and an idea started to form….
While this isn’t the cake my parents had over in Europe (I’m pretty sure that cake involved soaking raisins and using a yeast-based dough – which just wasn’t going to happen this busy spring), it was a fun experiment with a spice that I use, well, never.
I served this cake at a recent knit night, and then took the leftover to work. It was well received. The cake itself is moist and light, but fairly plain. It’s the Saffron-Orange Glaze that give it that something special. The glaze seeps into the cake, giving each bite a sweet brightness. And those little red pieces of saffron? So beautiful.
Recipe Notes
In the recipe below, I used 9-inch parchment paper circles (affiliate link) to make life easier and line the bottom of the cake pan. You can most definitely cut a circle from a regular roll of parchment paper, but these are just so convenient and easy to store that I like to keep a package of them on hand.
I’ve used my bottle of saffron, but tell me – what’s your favorite way to use saffron?
Put a sweet twist on that jar of saffron at the back of your spice cabinet! This light sour cream cake gets a sweet saffron-orange glaze that is beautiful and surprising.
Course
Dessert
Cuisine
American
Prep Time15minutes
Cook Time50minutes
Servings12
Calories299kcal
AuthorLiz
Ingredients
Ingredients for the Sour Cream Cake:
3/4c.unsalted butterat room temperature
1c.granulated sugar
1 1/2tsp.vanilla extract
2large eggs
8oz.sour cream(I used light sour cream)
1 3/4 c.all-purpose flour
2tsp.cream of tartar
1tsp.baking soda
1/4tsp.salt
Ingredients for the Saffron-Orange Glaze
1/3c.granulated sugar
3/4c. orange juice
1/4tsp.saffronabout 35-40 threads
Instructions
Make the Sour Cream Cake
Preheat oven to 350F.
Grease the bottom and sides of a 9-inch round baking pan. Line bottom with a piece of parchment paper and grease parchment paper. Set aside.
In a medium bowl, beat together butter and sugar until combined. Add vanilla extract, eggs and sour cream, again beating until combined.
Scrape down sides of the bowl (mixing again, if needed) and add half of the remaining dry ingredients. With a mixer on low, beat in dry ingredients. When just barely mixed, add remaining dry ingredients and mixed until incorporated throughout.
Pour cake batter into prepared pan. Use a butter knife or offset spatula to ensure batter is spread evenly throughout. Bake in prepared oven for 45-50 minutes, or until a toothpick inserted into the center comes out clean.
Prepare the Saffron-Orange Glaze:
Just before removing cake from oven, combine all ingredients for the glaze in a small pot set over medium heat on the stove. Stir constantly, until sugar has dissolved. Bring to a boil and allow to boil for a few minutes, stirring occasionally.
Lower heat, keeping the glaze warm until ready to glaze the cake.
Glaze the Cake:
After removing cake from oven, allow to cool in the pan set on a wire rack for 10 minutes. Then, invert cake onto serving dish. Use a metal or wooden skewer to poke deep holes in the cake - all over. Skewer should never touch the bottom of the dish, but should go almost all of the way through the cake.
Spoon hot glaze over still warm cake.
Allow cake to cool completely (which also allows the cake to soak up that saffron-orange glaze) before serving, or covering with plastic wrap until ready to serve.
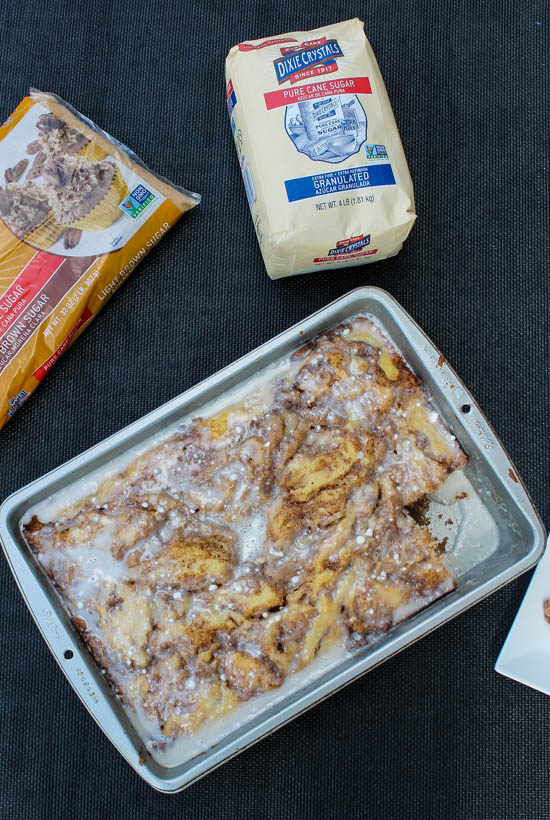
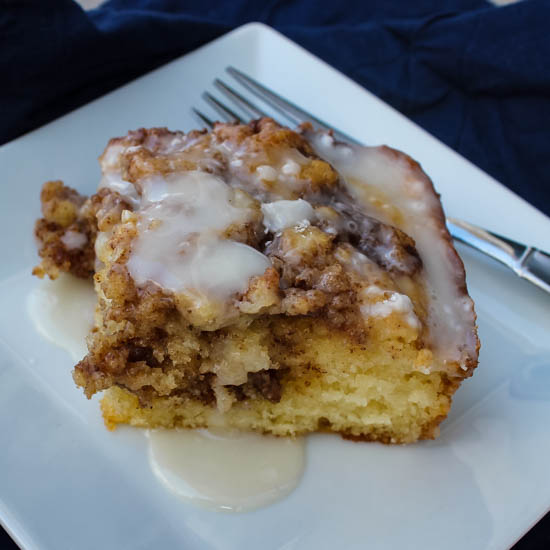
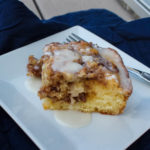
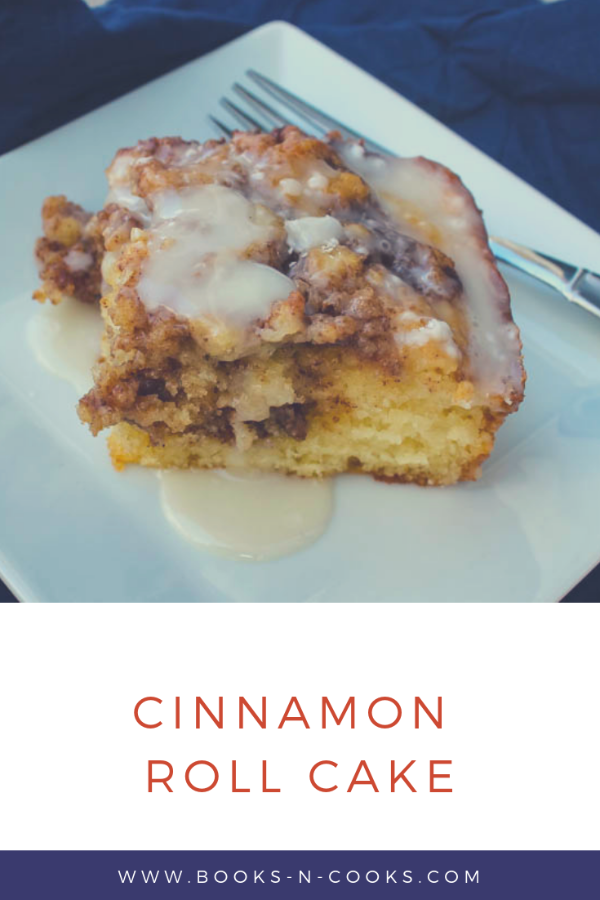
This Cinnamon Roll Cake is a light, fluffy cake swirled with rich cinnamon, reminiscent of one of my favorite breakfast pastries.
This post is sponsored in conjunction with #BrunchWeek. I received product samples from sponsor companies to aid in the creation of the #Brunchweek recipes. All opinions are mine alone.
Welcome to #BrunchWeek 2019! This is one of my favorite foodie events of the year, hosted by Terri of Love and Confections and Christie of A Kitchen Hoor’s Adventures – it’s a week of delicious sweet and savory breakfast, brunch, and lunch items, from desserts to main courses to beverages – this year over 40 recipes from 35 bloggers. Every year I pin more recipes that I can possibly make and it’s AMAZING.
So here’s how today is going to work. We’re going to talk about my first recipe, Cinnamon Roll Cake. Then, we’ll talk a little bit about the #BrunchWeek sponsors and some great prize packages they’ll be offering. You’ll have multiple chances to win, so be sure to read through the info and then enter. And finally, I’ll have a list of the first round of #BrunchWeek recipes today, posted by my blogging friends. Not interested in a list of links? Check out the #BrunchWeek Pinterest Board or search the hashtag on social media.
I’m starting off this week with a much-needed indulgence. The past month has been absolutely crazy – 5 trips for myself and my husband (some solo, some with the whole family) in the past month. I feel like all I’ve done is pack and unpack, and struggle to keep up a normal life.
With that schedule, there was no way I’d be able to get you as many recipes as I would have liked – heck, I’ve been anxious to make one particular dish for this event for almost 2 years now, and still haven’t made it happen – so I knew that I’d have to make this year’s recipes good. And this Cinnamon Roll Cake? SO GOOD!
Seriously – it’s light and fluffy with rich cinnamon swirls. Outstanding warm, with the glaze still glistening but still delicious at room temperature. It’s a great alternative to the traditional breakfast pastry.
This Cinnamon Roll Cake is a light, fluffy cake swirled with rich cinnamon, reminiscent of one of my favorite breakfast pastries.
Course
Breakfast
Cuisine
American
Servings20
AuthorLiz
Ingredients
Ingredients for the Cake:
3c.all-purpose flour
¼tsp.salt
1c.sugarI used Dixie Crystals
4tsp.baking powder
1½c.milk
2large eggs
2tsp.vanilla
½c.unsalted buttermelted
Ingredients for the Cinnamon Swirl:
1c.unsalted buttersoftened
1c.brown sugarI used Dixie Crystals
2Tbs.all-purpose flour
1Tbs.cinnamon
Ingredients for the Glaze:
2c.powdered sugarI used Dixie Crystals
5Tbs.milk
1tsp.vanilla extract
Instructions
Make the Cake Batter:
Preheat oven to 350F. Spray a 9x13 inch baking pan and set aside.
In a medium bowl, whisk together flour, salt, sugar, and baking soda to combine. Add milk and eggs and beat with an electric mixer until just combined. Beat in melted butter.
Pour into prepared pan and set aside.
Make the Cinnamon Swirl & Bake the Cake:
In a small bowl, combine all ingredients. Beat on medium speed until combined. With clean hands, crumble/drop evenly over cake batter. Use a butter knife to swirl cinnamon mixture into cake batter.
Bake for 35-40 minutes, until a toothpick inserted into the center comes out clean. Remove from oven and allow to cool for 15 minutes.
Glaze the Cake:
Whisk together all ingredients and drizzle over warm cake. Serve immediately or allow to cool before covering with plastic warm an storing at room temperature.
Our BrunchWeek Sponsors are helping us give away some great prizes. Thank you so much, Sponsors, for your generosity. We have an incredible giveaway below and we’d love if you would take a moment to read about it and what you can win!
Dixie Crystals is giving one winner a Keurig K-Select Single-Serve K-Cup Pod Coffee Maker.
Since 1917, Dixie Crystals® has been the South’s choice for high-quality sugar and sweeteners. For generations, Dixie Crystals has been at the heart of family traditions and celebrations. Our pure cane, non-GMO sugar products guarantee that treasured family recipes will turn out right every time. Bake with love and Dixie Crystals.
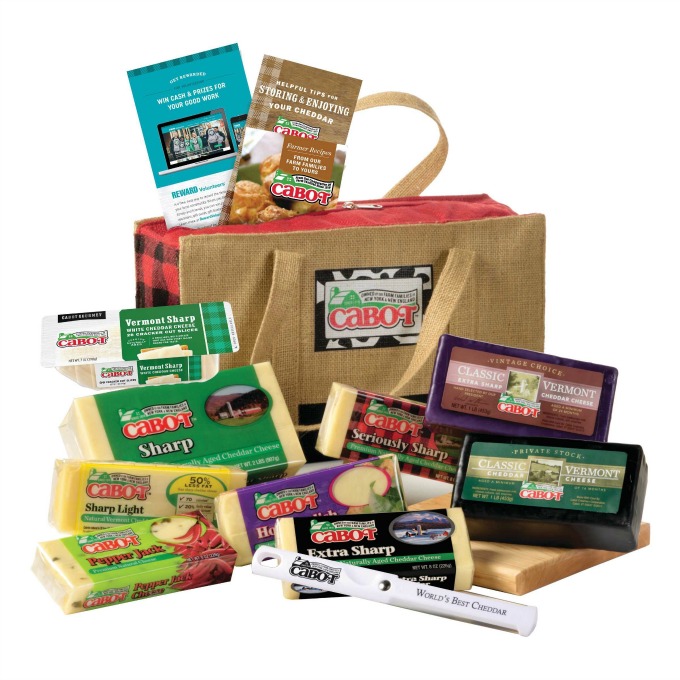
Cabot is giving one winner a gift box of assorted Cabot cheeses.
The farm families that own Cabot Creamery Co-operative love what they do. And they’ve been doing it for a long time—every single day since 1919. Almost 100 years later, we’re proud of our thriving farms, strong communities, and happy, healthy cows that produce the rich, buttery milk that we use to make Cabot’s award-winning cheese and dairy products. We like to think those awards mean we’re doing something right. Of course, you’re a big part of this too. If you love eating our cheese as much as we love making it, then we’ll get to keep doing what we do for generations to come.
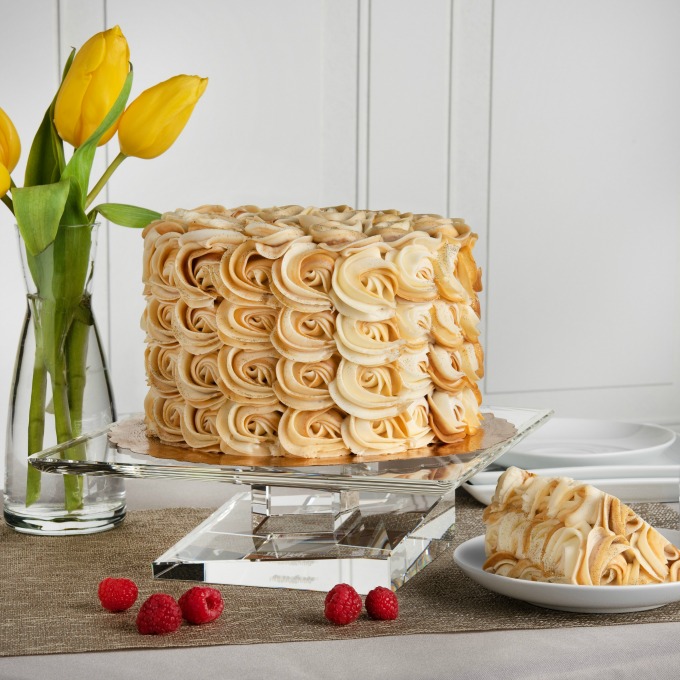
Joyjolt is giving one winner a Carre Crystal Glass Cake Holder. Limited edition of 500 in the exclusive series. Made out of 100% high quality crystal. DRINK WITH JOY. ENJOY THE JOURNEY.
Here at JoyJolt we believe that so many of the moments you enjoy most include raising a glass. From the jolt you get from that first sip of coffee in the morning to toasting a milestone with close friends. That’s why we have created glassware equally as special and unique as your happiest moments.
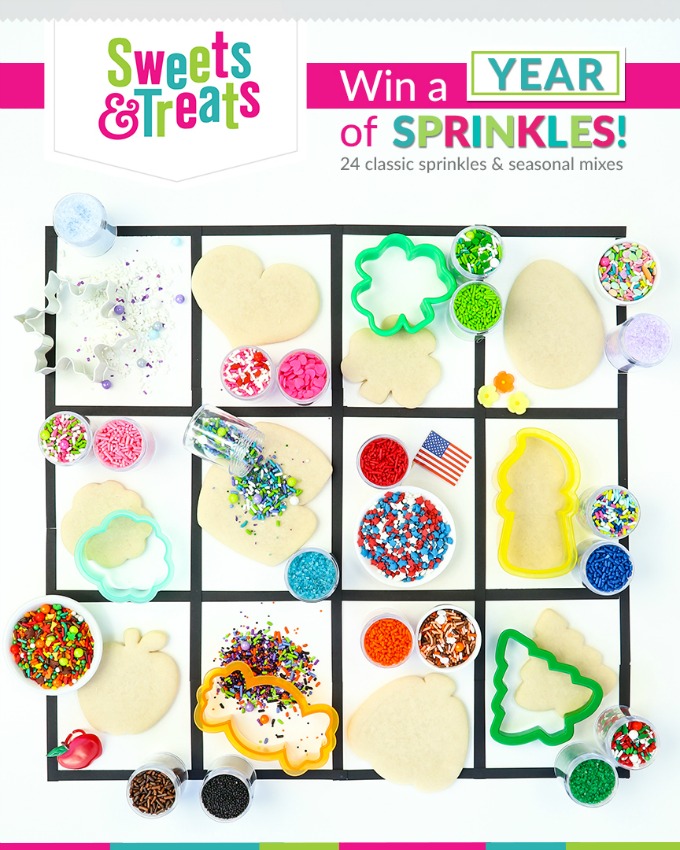
Sweets & Treats is giving one winner the Year of Sprinkles that contains holiday mixes, classic sprinkles, and some of their most popular sprinkles, assorted cupcake liners, and the My Little Pony Baking Book.
Sweets & Treats, a party and baking supplies manufacturer and wholesaler, started out of a baking industry need for truly grease-proof cupcake liners. From there, the company expanded into a handful of specialized categories including the latest, Sweet Sprinkles, their one of a kind sprinkles and sprinkle mix line. With hundreds of truly unique products, they are a one stop shop for your next party!
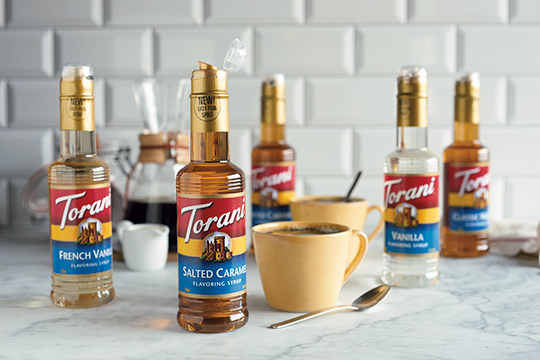
Torani is giving one winner a year supply of Torani: 12-750ml glass bottles, flavors will be winner’s choice, plus pumps for each bottle.
Torani inspires you to taste life, one flavorful experience at a time. Even though people all over the world recognize our iconic Torani bottle, we’ve remained a family-owned company — adhering to the high quality standards that Rinaldo and Ezilda set over 90 years ago. Each and every syrup, sauce, and smoothie is created with care and pride. Way back we started with just five syrups. Today, you can use more than 100 of our naturally flavored syrups, sauces and beverage bases in coffees, sodas, teas, smoothies, cocktails and more. And we’re excited to bring you new taste traditions and flavors as we move forward.
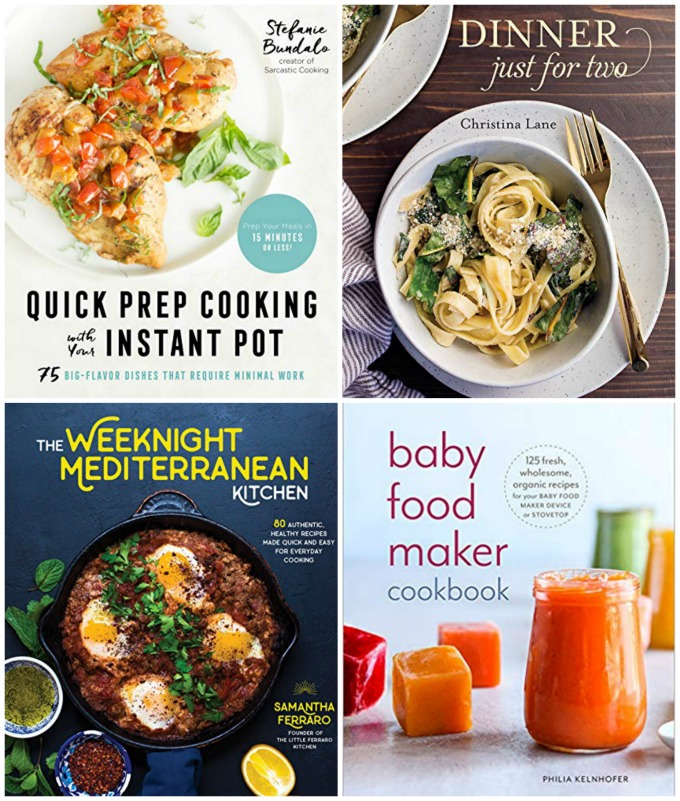
PRIZE#6 COOKBOOK SET
Sarcastic Cooking is giving a copy of her book, Quick Prep Cooking with Your Instant Pot – 75 big-flavor dishes that require minimal work
Dessert for Two is giving a copy of her book, Dinner Just for Two – a cookbook that inspires couples to get into the kitchen together
Sweet Phi is giving a copy of her book, Baby Food Maker Cookbook – 125 Fresh, Wholesome, Organic Recipes for Your Baby Food Maker Device or Stovetop
The Little Ferraro Kitchen is giving a copy of her book, The Weeknight Mediterranean Kitchen – 80 Authentic, Healthy Recipes Made Quick and Easy for Everyday Cooking
Disclaimer: Thank you to #BrunchWeek Sponsors: Dixie Crystals, Cabot Cheese, Joyjolt, Sweets & Treats, Torani, Sarcastic Cooking, Dessert for Two, Sweet Phi, and The Little Ferraro Kitchen for providing the prizes free of charge. These companies also provided the bloggers with samples and product to use for #BrunchWeek recipes. All opinions are my own. The #BrunchWeek giveaway is open to U.S. residents, age 18 & up. All entries for the winner will be checked and verified. By entering you give the right to use your name and likeness. The number of entries received determines the odds of winning. Six (6) winners will be selected. The prize packages will be sent directly from the giveaway sponsors. Winners have 48 hours to respond once chosen, or they forfeit the prize and another winner(s) will be chosen. The #BrunchWeek Bloggers are not responsible for the fulfillment or delivery of the prize packages. Bloggers hosting this giveaway and their immediate family members in their household cannot enter or win the giveaway. No purchase necessary. Void where prohibited by law. This promotion is in no way sponsored, endorsed or administered by, or associated with Facebook, Instagram, Pinterest, Twitter or any other social channel mentioned in the #Brunchweek posts or entry.