These 5-ingredient little nuggets take a while to make, but they’re easy and totally worth the time investment. A family recipe, these Peanut Butter Balls are a favorite among family and friends. Make them once, and they’ll be requested every year after that!
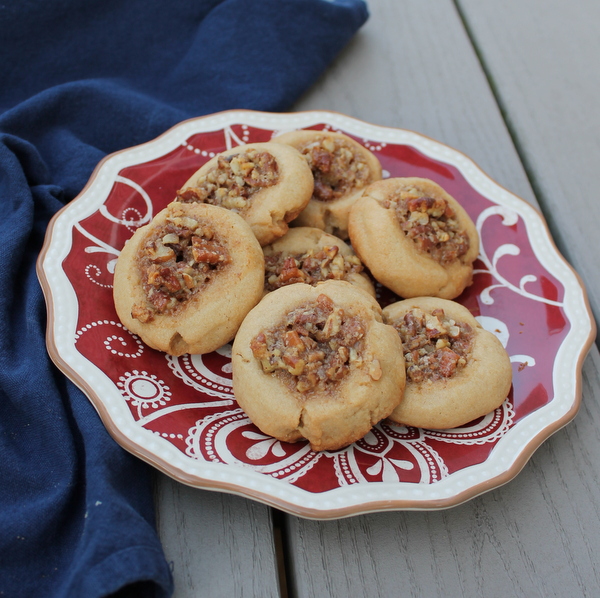
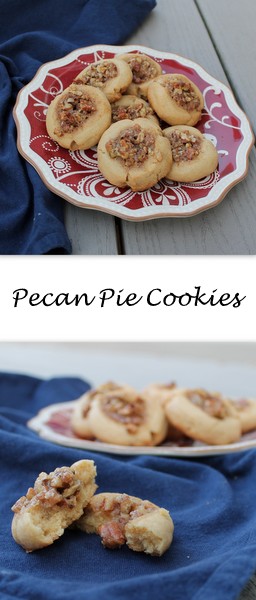
Pecan Pie Cookies feature a sweet shortbread cookie topped with classic pecan pie flavors.
Did you know that April 14th is National Pecan Day? There’s a food holiday for everything, and you know what? Food bloggers love to celebrate them all. I’m particularly excited about today’s selection of recipes from my blogger friends. While I was excited to host, I ended up striking out with the first recipe I made for this event. And it was much more difficult for me to come up with a recipe I was excited about – I wanted to make a non-dessert. Didn’t happen, but I’m thrilled to see some of the more savory uses for pecan below. I can’t wait to try them, and make up my own for next year!
These Pecan Pie Cookies were something I had made (and blogged) years ago. These cookies were a winner when I first made them (and the second and third time, shortly after the first). I thought these cookies would become one of my holiday favorites. But then I kind of forgot about them, and when I remembered them, I got sidetracked with trying out new recipes. National Pecan Day was a good excuse to make and enjoy the cookies again (and update the lousy photos that were originally published with this recipe).
And now on to the cookies… These Pecan Pie Cookies have the wonderful sweetness of pecan pie filling, but without all of the gooeyness that I don’t care for in traditional pecan pie. The cookies stay very soft for a few days and freeze amazingly well. So make them today, save them for Thanksgiving holidays, but just make them.
Pecan Pie Cookies feature a sweet shortbread cookie topped with classic pecan pie flavors.
Course
Dessert
Cuisine
American
AuthorLiz
Ingredients
Ingredients for the Cookie:
1c.brown sugarpacked
3/4c.butterat room temperature
1egg
1tsp.vanilla
2c.all-purpose flour
1tsp.baking powder
Ingredients for the Pecan Filling:
1c.chopped unsalted pecans
1/2c.brown sugarpacked
1/3.heavy whipping cream
1tsp.vanilla
Instructions
Make the Cookies:
In a large bowl, beat at medium speed sugar, butter, egg, and vanilla until creamy. (It will take a few minutes for dough to come together.)
Lower speed and add in flour and baking powder, beating until combined.
Chill for 1 hour, to prevent dough from spreading too much when baked.
Make the Filling:
Just before removing dough from refrigerator, preheat oven to 350°F and line two baking sheets with parchment paper. Set aside.
Then, combine all filling ingredients in a bowl, mixing well.
Assemble and Bake the Cookies:
Remove dough from fridge. Roll dough into 1 1/4-inch balls, placing the balls 2 inches apart on the cookie sheet.
Using your thumb, make an indentation in the center of each cookie, rotating your thumb to deepen and widen the indentation slightly.
Fill each cookie - indentation with 1 teaspoon of filling. I made all the cookies at once (using parchment paper on the counter for those that didn't fit on my cookie sheet) so that if there was extra filling, I could spread it around.
Bake for 8-12 minutes, until lightly browned.
Let sit on cookie sheets for a minute or two before transferring to a cooling rack to cool completely. Store in an airtight container at room temperature.
Recipe Notes
Makes 2-3 dozen cookies.
Recipe Notes:
These cookies freeze well. Freeze for up to 3 months in an airtight container, with wax paper between layers.
For my wedding, a family friend gave me a lovely gift off my registry – a “cookie package” that included nice baking sheets & a cooling rack, a cookie press, a silicon baking mat, parchment paper, a silicon cookie spatula (which is awesome by the way!)… however, the hit of her gift was a cookie cookbook, Southern Living’s Best Loved Cookies. This is the second recipe I’ve tried from there (the first being Peanut Butter Caramel Turtle Cookies) and bot got outstanding reviews. So thank you, LJ, for a wonderful gift that keeps on giving. 🙂
Southern Living did not disappoint me with Mississippi Mudpie Cookies – this new recipe was probably the biggest hits of the night. Soft and chewy, all were gone at the end of the night.
Preheat oven to 350°F and line two baking sheets with parchment paper.
In a microwave-safe bowl, heat semisweet chocolate chips for 30 seconds. Stir and heat for another 30 seconds. Stir until smooth. If necessary, microwave chocolate again for 15 seconds.
Using an electric mixer, beat together butter and sugar until creamy. Add eggs, beating until combined. Add vanilla and melted chocolate, beating until combined.
Add flour, baking powder, and salt to mixture, half a cup at a time.
Stir in pecans and milk chocolate chips.
Using a tablespoon, portion out batter onto prepared baking sheets. Press 3 marshmallows onto each mound of dough.
Bake for 10-12 minute, until cookies are set. Allow to cool briefly on baking sheets before moving cookies to a wire rack to cool.
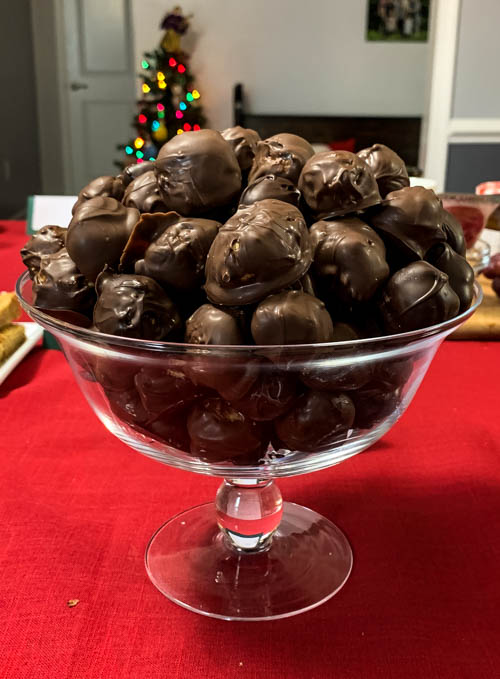
Instead of the traditional Christmas cookies, my mother-in-law makes Christmas candies – orange balls, Oreo truffles, peanut butter balls, turtles, coconut balls… Since we won’t be home for the holidays this year, I decided to treat my husband to two of his favorites – the Oreo Truffles and Peanut Butter Balls for our annual holiday party.
Two notes about this recipe. First, I credit the recipe to my mother-in-law, as I used what she gave me. However, there are many Oreo truffle recipes out there, with slight variations – for example, Bakers Chocolate has a recipe on AllRecipes that uses Bakers Chocolate as the chocolate coating instead of candy-melts.
Secondly, although these have cream cheese in them, my mother-in-law never refrigerated them, but rather kept them at room temperature in an air tight container.
Anyway, this is the first time I’ve made truffles, or anything that involved dipping in chocolate, so they aren’t that pretty but they were good!
Dec 2009 Update: I tried making these with white chocolate instead of candy melts, and the white chocolate just did not work – it was way too think. However, we did use plain bittersweet chocolate, melted, and that worked just fine if you don’t have candy-melts on hand.
Oreo Truffles
Yields: About 6 dozen truffles
1 package Oreos, crushed
1 8-oz package cream cheese
2 bags white-chocolate candy-melts
Line two baking sheets with wax paper or parchment paper.
Microwave cream cheese for 30 seconds or so, until soft enough to stir.
Using a wooden spoon, combine Oreos and cream cheese. If your Oreos were in larger chunks, you should be able to crush them with the spoon, so that the cream cheese and cookies are well blended.
Roll into balls, slightly smaller than a golf ball and refrigerate for at least an hour.
Melt white chocolate in microwave, stirring until completely melted.
Dip Oreo balls in white chocolate and place back on wax paper to solidify again.
Keep the Oreos in an air-tight container in a cool place or refrigerate until serving.
Barefoot Bloggers challenge… yep, I’m so incredibly late. Not going to lie, wasn’t excited about this recipe so I might have been procrastinating on it a bit. I haven’t had any creme brulee that I like, partly because I’m not a fan of the texture of custard. However, I was pleasantly surprised with this one, perhaps because the ramekins I used were wider and shorter than most I’ve seen (only about half an inch tall) – thanks to J for letting me borrow them!. Thus, much more sugary goodness to go around.
I attempted to half this recipe to make only 2 servings. I wasn’t thinking and used two whole eggs, instead of one whole egg and an egg yolk so my custard texture wasn’t quite right. It still came out pretty good, but maybe a little creamier. And of course, I ended up with a balloon of sugar on top, but that’s ok. I still finished mine and the hubbie said to keep the remaining two for tomorrow night!
Creme Brulee
Source: Published in Ina Garten’s Barefoot in Paris and on the Food Network
Serves 4 (if using the 1/2 inch tall ramekins)
Ingredients:
1 egg
1 egg yolk
1/4 c. sugar, plus 1 Tbs. per serving
1 1/2 c. heavy cream
1/2 tsp. pure vanilla extract
1 Tbs. Grand Marnier
Prepare the custard well before serving….
Preheat the oven to 300 degrees F.
Start heating cream in a small saucepan over medium to medium-high heat until hot to the touch but not boiling.
Meanwhile, start boiling water for the water bath (I used my tea kettle).
Also, mix the egg and sugar in a stand mixer fitted with the paddle attachment, until just combined. When cream is hot, slowly add cream to eggs. When combined, add vanilla and Grand Marnier.
Ladle custard mix into 6-8 ounce ramekins until almost full.
Place ramekins in a baking pan and add boiling water, until water hits halfway up the sides of the ramekins.
Bake 35 minutes or until custard is set when gently shaken. With a pair of tongs, remove ramekins to cool to room temperature.
Refrigerate until firm.
Just prior to serving….
Since I didn’t have a kitchen blowtorch took a hint from JennCuisine and used my oven’s broiler instead. I sprinkled 1 Tbs. sugar evenly over each ramekin and stuck them in the oven on broil, rotating every minute to so to make sure the sugar didn’t burn. The sugar was supposed to be crispy throughout (takes about 3 minutes) – not so much for mine. I figured they were done when the sugar puffed up and was slightly browned.
Let rest for a minute, until the sugar hardens. If the sugar puffs up like mine, then you’ll get a crusty little balloon on top! 🙂